DIY Bookcase Industrial Traditional Rustic Part 1

| March 26, 2015
Photo Credit: Keith Knoxsville
A Hen and a Drake Green Teal on the truck bed. Not a limit on anything, but a fun morning out.

Bookcase

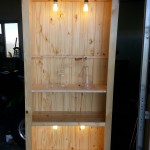
I wanted a flexible shelving unit to sprout seedlings, store items, conduct lab experiments, and I didn’t want an eyesore. I recently splurged on a new table saw, so I decided to build an industrial, traditional, and rustic inspired pine bookcase, over slapping together another ugly shelving rack unit.

New materials were used, but I stripped down a pine shelving unit I quickly slapped together last year, and hated, and salvaged what I could for the new bookcase. This helped me save on the cost a bit, and gave me an excuse to erase the old shelving unit monstrosity from my mind. The new bookcase also utilizes electrical equipment purchased for dirt cheap at a salvage store, ReStore. If you haven’t heard of ReStore, check them out! They are a chain of recycling shops run by Habitat for Humanity, and they help reduce waste.

This is more of a build log than it is a how to, but I will outline the bulk of materials, and general costs at the end of part 2 of the build. If anyone wants me to draft out the plans, I can probably do that, but the construction is fairly simple. The construction of the bookcase was done in 2 days, using a table saw, a router, and basic tools. I’ll get into modular shelving and the electrical work in part 2.

Step 1: Face Frame
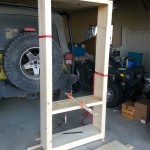
The face frame was made from a 6″ board ripped in half for the sides of the face frame, a 3″ board for the top cross member, and 4.5″ board for the footer. The boards were joined with a lap joint glued, and reinforced by 5/8″ screws. The lap joints will ultimately be hidden in step 7.

Step 2: Sides
The sides are made from 12″ boards cut to a 6 1/2′ length. The bottom receives a dado that is level with the bottom of the face plate. The distance is adjusted the thickness of the supporting bottom board, which is 3/4″, for a full length of 35 1/4″.

A 3/4″ dado is made at the height of the first permanent shelf. A 3/4″ rabbit is made at the top to accept the top board/shelf.

At this point, its smart to run a router bit across the inside backs of the top, bottom, and side boards, so that a backing can be accepted later. We removed a 1/4″ of material, the 1/4″ depth of the backing material.

Step 3: Joining Sides
The top and bottom boards were slipped into their respective rabbits and dados with glue, squared, and reinforced with a total of 12 wood screws. The screws will ultimately be hidden in step 7.

Bookcase Glue Up

Step 4: Joining the Face
The face Frame was laid on the bookcase, glued, and secured with finishing brads. It was also secured with straps to help keep everything in place while work was being done. I later added a couple small subtle 45* cut corner braces that were secured inside the bookcase with glue and screws, to add strength.

Step 5: Fixed Shelf & Top Brace
Strips of 3 1/2″ salvaged boards were cut to 35 1/4″ lengths and glued into the fixed shelf dado. A rear gap of 1/4″ was left to accommodate for the backing.

A 3.5″ brace was added to the inside top of the cabinet to reinforce the cabinet, maintain a square, and give some surface area for which the backing can be secured.

Step 6: Backing
1/4″ tongue and groove pine siding was used to create a matching backing. It was cut to the 6 1/2′ height, minus the board thickness of 3/4″ all around, and a 1/4″ lip added all around to fit securely into the 1/4 rabbit created at the end of step 2. Glue, patience and finishing brads are used to secure the backing.

Step 7: Top and Bottom Trim
A top trim of 3″ and bottom trim of 4.5″ was mitered to 45* angles, glued and secured to the tops and bottoms of the cabinet. This is what hides, the ugly wood screws and the lap joints.

Step 8: Shelf Supports
Shelf supports were added by cutting trim to the depth of the bookcase, and secured with 5/8″ wood screws. Guide holes were drilled to prevent splitting.

Step 9: Lacquer
I chose to finish the pine with a clear gloss lacquer. I thought it preserved the pine the best, while maintaining a rustic, traditional, and industrial look.
Tags: , , , , | Comments

Elk Meatball Pho Soup

| March 2, 2015
Elk Meatball Pho Bowl
Photo Credit: Keith Knoxsville
A Hen and a Drake Green Teal on the truck bed. Not a limit on anything, but a fun morning out.

Elk Pho

Elk meatball pho soup is an improvised wild game version of the classic Vietnamese Pho noodle soup. Total preparation and cooking time is about 3 hours, but this is mostly because of the long simmer to make a quality soup stock.

Servings: 6
Cook Time: 3 Hours
Prep Time: 30 Minutes

Ingredients
Basil – 1 bunch (Thai variety if availabe to you)
Mint – 1 bunch
Cilantro – 1 bunch
Jalapenos – 2 small ones
Green Onions – 1 bunch
Limes – 1 to 2
Ginger – 2 palm sized pieces
Bean Sprouts – 1 lbs. (mung bean)
Onion – 1 small onion
Garlic – 3 large cloves
Star Anise – 5 pods
Cinnamon – 2 large sticks
Cloves – 5 (optional)
Red Pepper Flake – 1/2 teaspoon
Black Pepper – 1 teaspoon + a pinch.
Salt – 2 to 6 tablespoons of salt
Sugar – 2 to 6 tablespoons
Two Femur Bones (We used Beef bones, but others will work)
Ground Elk – 1-2 lbs.
Rice Noodles 1- 8 to 12 ounces dry weight

Fish Sauce – Used to finish while serving
Chili Sauce – Used to finish while serving
Hoisin Sauce – Used to finish while serving

Instructions
Stock:
Fill large stock pot with 7-8 quarts of water. This will be the broth, so use a quality filtered water.
Add two large femur bones 4-5 inches in length.
Slice the two pieces of ginger, add to stock pot.
Slice 3/4 of an onion, into about 8 pieces, add to stock pot.
Add 5 pods of star anise.
Add 5 cloves.
Add 2 large sticks of cinnamon.
Add 3 large cloves of garlic, crushed.
Add 2 tablespoons of Salt.
Add 2 tablespoons of sugar.
Add 1 teaspoon fresh cracked black pepper
Bring entire stock pot to a light boil. Let boil for up to 3 hours.
Keep stock pot mostly covered, but be careful to avoid boil overs.
After the femur bones have boiled for a while, and its safe to do so, sample the broth, and add more salt if necessary.
Check stock pot frequently, and add filtered water back to the stock as it reduces.
Adjust any ingredients during the boil to enhance any flavors to your personal preference.

At 2 hours into boil, prep Meatballs

Meatballs:
Finely chop 1/4 of an onion, add to mixing bowl.
Finely chop 1/8 cup cilantro, add to mixing bowl.
Finely chop 1/8 cup basil, add to mixing bowl.
Add a pinch of salt and black pepper.
Add 1/2 teaspoon of red pepper flake.
Add 1 to 2 lbs ground Elk to mixing bowl. (or substitute with meat of your choice)
Mix with hands, until ingredients are consistently distributed.

At 2.25 hours into boil skim broth.
Remove femur bones, large particles of ginger, and sieve out all smaller ingredients, as well as marrow that has escaped from the femur bones that cloud broth and build at the surface.

At 2.5 hours into boil, form and cook meatballs, prepare rice noodles.
Form meatballs by hand, and add to the now clear(ish) pho stock.
Bring water in a separate large sauce pan to a boil, add rice noodles to hot water ad let sit for ten minutes, then drain. This is typical preparation for a rice noodle, but some noodle instructions may differ, so follow your own noodle package instructions.

Right before serving, prepare garnishes
Garnish:
Slice Jalapenos
Rinse Basil, Cilantro, and Bean Sprouts
Slice lime into wedges
Rinse and slice a couple green onions into small rings
Get Chili sauce, fish sauce, and Hoison sauce ready to serve
Plate all garnishes

Serve
Meatballs should become buoyant right around the time that they are finished. As soon as the meatballs are cooked all the way through, the pho is ready for serving. Line up some bowls, use tongs to place cooked noodles into the bottom of the bowl. Ladle broth and meatballs over the noodles. Tear cilantro, mint, and basil by hand, and add to your pho in any quantities that you feel appropriate. Squeeze lime wedges, add chili sauce, maybe a few drops of fish sauce, add Hoisin sauce, jalapenos, green onion, and bean sprouts. Add only what you want, and the amounts you prefer, and enjoy.

Tags: , , , , , | Comments